Showing posts with label Party. Show all posts
0

Photo Shoot Preview


On Monday we held a little Easter picnic in our garden, and combined it with a photo shoot for some new Pointless Pretty Things products. It was so fun! I made a ribbon backdrop and set up a lounge area, and we ate lots of food and drank tea from teacups. Thanks to two of my beautiful besties for being wonderful models. 

I've been working on this new range of wedding accessories for a while now, and I am SO excited to finally release them next week. 

Hope everyone is enjoying the sunshine...

x Rachel 
0

Wedding Planning - The Big To-Do List


As I mentioned in this post in January - Jake and I got engaged over Christmas! It's been a very exciting time behind the scenes over here, visiting venues, drawing up budgets and pinteresting (obviously)... We're getting excitingly close to booking our venue, so I thought it was high time I wrote the first (of many I'm sure) wedding planning post. 

We're looking at Summer next year, so we have plenty of time - but having designed weddings for other people before and knowing how much work is involved, we knew that we wanted to get organised as soon as possible. To start us off, we made this big planning board to act as our master todo list - it really is the list to end all lists! 


We sat down together and just blurted out every possible thing we thought might come up during the wedding planning, organised them into different categories, and wrote each task on a separate bit of paper (colour coded of course). The board is divided into three sections: the main list, the area of focus, and the "done" area. As you can see, we have barely started! But it's so satisfying to move things over to the completed section. 

What I like best about this method, is that it's a really great way to look at everything all at once in a digestible way. Having each task on a separate bit of paper that you can move around, or take away all together, is so helpful. We can decide what tasks we're focusing on each month, and just concentrate on them rather than being overwhelmed by everything all at once.


Our list is probably a little bit over-kill, and a lot of it will probably be irrelevant as decisions start to be made, but it has been really useful to have everything we're thinking about out in the open and in such a visual way. I'm sure a lot of people think we are total freaks - some of our friends have definitely had a little chuckle/eye roll on seeing this up in our house! But putting on shows/events is what both of us do for a job, so we can't help but geek out a bit... 

Does anyone else plan like this? Any tips from any of you? 

x Rachel 
0

Coming Soon - New Sparkly Wedding Stuff.....


Lots of exciting things happening in the studio this week! I am in super making mode at the moment, working on lots of new prototypes for the wedding season... I am right in the middle of designing and testing a few new lines for the Pointless Pretty Things shop, which will be released soon, but I just couldn't wait to share some sneaky pictures with you! 

Expect luxe, sparkly copper tones, new breeds of paper flowers, and most excitingly.... a whole range of flower crowns! I just can't wait to reveal them all soon, but for now - back to work...

I'm also now accepting custom requests from brides with a vision they want to accomplish for their wedding - so if that's you, and you have an idea you would like help realising, just drop me a message to say hello at pointlessprettythings@gmail.com. 

x Rachel 
0

Moulin Rouge Event Design

1//2//3//4//5//6//7//8

Hello, it's been a while - again! I just thought I'd pop by and share one of the many reasons for my internet absence... I'm styling up a Moulin Rouge event next week for around 300 guests - crikey.

Moulin Rouge is a bit of a gift of a theme really, lots of luxurious red draping and marquee sign making, black and red ostrich feathers and diamantes . I've finally got an excuse to try out the many light-up sign tutorials I've been seeing on Pinterest recently. I'll be sure to share some pictures of the finished article next week. 

In other news, although it has been quiet here, I've got plans for little old bloggy... Maybe a redesign, but most definitely a refocus. This year so far has been amazing work wise, but has knocked me sideways slightly. I feel like I am spinning so many plates that my favourite ones keep slipping (this blog and shop being the favourite plates in this analogy). I just need to find a way of slotting them back into my life in a way that's sustainable, so hopefully some of you will stick around while I work out the kinks. 

Lots of love, 

x Rachel 
0

DIY Pom Pom Cake Toppers


There is nothing like making something a little bit special just for the sake of it. These cake toppers are so easy and instantly make a simple cupcake into a party-worthy treat. I've seen this method for making pompoms a lot on Pinterest and I've been wanting to try it out for ages. It definitely beats cutting out those little cardboard circles! 


You will need: a fork, bakers twine (or wool), cocktail sticks, hot glue, scissors. 

1// Wrap the bakers twine around the prongs of the fork tightly and evenly until there are plenty of layers. 

2// Leave a couple of inches at the end of the twine and use it to tie the middle of the pompom between the prongs. This bit is a bit fiddly as you need to get it as tight as possible so that no strands escape.

3// Slide the strands off the fork and snip the loops on both sides, fluff the strands out to get the pompom into a round shape. 

4// Use hot glue to secure the pompom on to a cocktail stick. 

5// Now you need some cupcakes to decorate! 


I love how these little mini pompoms look bunched together on one cake. They remind me of sparklers! I want to try making some in lots of different colours... 

If you like the look of these cupcakes, the recipe is from the Hairy Bikers "Hairy Dieters" cook book (my favourite cook book of all time!) You can also find it online here. This time I substituted blueberries for raspberries, but they are lovely with blueberries too. 

Now I'm off to eat that cake - a blog post bonus :) 

x Rachel 
0

DIY Doily Wall Art


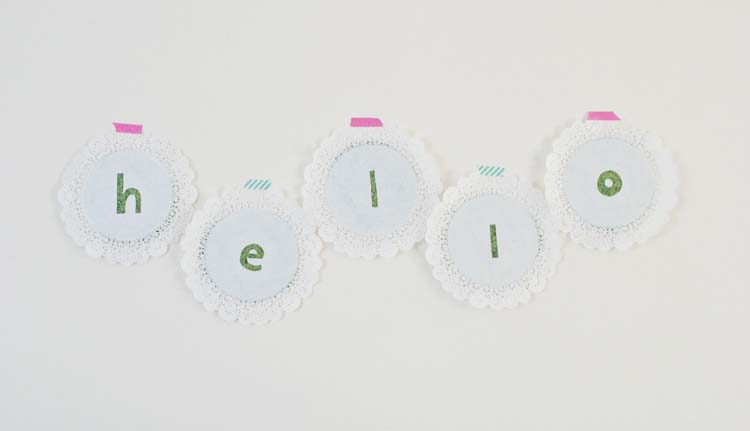
I saw a great tutorial in Molly Makes recently using embroidery hoops to make a really sweet bit of wall art. I'm definitely going to be trying it out when I have a bit of time and the materials, but for now I wanted to try out a really simple one using paper doilies. 


You will need: Paper doilies, craft knife, wrapping paper (I'm obsessed with this grass pattern from Tiger), glue/double sided tape. 

1// After you've decided which word you would like to make, draw and cut out your letters into the doilies with a craft knife. 

2// Cut circles of patterned paper to the same size as the solid part of the doilies (leaving the lacy part bare). 

3// Stick the paper on to the back of the doilies. I like to use double sided tape because glue is very messy and would probably cause the paper to warp. 

4// Use washi tape to fix your doilies up on the wall. 

This is a really easy little project - and probably not something that I'll be keeping up for ever - but definitely something I would do again for parties! 

Hope you all have a lovely weekend, 

x Rachel